Sunday, July 31, 2011

The Baby Shower Aftermath

The shower was wonderful! Denver received so many adorable things. It took 4 cars to get it all home. Needless to say, he's a little spoiled already. It's going to take me a few days to go through everything and get it all organized. A dear friend of mine came over after the shower and helped me get everything out of the bags and make piles of stuff around his room so it would be easier to see what we have and go through it.


We were so blessed to get his travel system, bath tub, bedding and high chair. So, we have all of his big stuff!


He received so many books, lots of diapers and wipes (thank goodness) and about 40 blankets!


Lots of bath stuff, our breast pump and lots of neat things like a play mat, an entertainment bar for his carseat, etc.


And we're going to be able to use almost all of the decorations they used at his shower, in his room. I can't wait to put it all together!

Saturday, July 30, 2011

Baby Shower

Today is my first Baby Shower! I have another one a week from today. I can't wait to see everyone and get to visit and then, of course, see all the cute baby things.
I have a feeling the next couple of weeks are going to be very busy washing, folding, unpacking, putting things up, organizing, etc. I can't wait!
I'll post pictures soon.

Friday, July 29, 2011

Personalized Hand Sanitizer

Because the school is full of germs, I wanted Mer to have some hand sanitizer on her desk, that would look cute with the rest of her stuff.
So, I went to the dollar store, got a bottle and came home and scraped the label off. Then I got out some black vinyl and the remainder of the red ribbon that I had used on her other projects. I got on my Silhouette software and made something up really quick. I just measured the bottle first to make sure that I had enough room to put what I wanted. I used the same font as I have for all of her projects (Andrea Karime downloaded from dafont.com)
The process was the same as adhering vinyl in all of the other projects I have done. Then I tied a small bow around the top to give it a little color. I thought it needed something else so I loaded up some white vinyl and started playing around.
I wound up just making brackets for each side of the font. Just to add a little white, and to mimic the shape that I used on the classroom jars. All in all, this project was SUPER cheap and took less than 10 minutes to make. I think it will be a cute (and useful) addition to her desk.

Thursday, July 28, 2011

Custom Classroom Jars

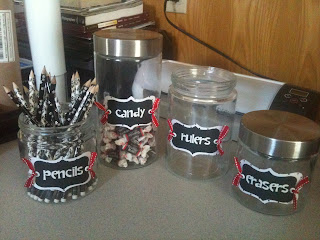
Meredith asked me to make some jars for her bookshelf in her classroom, so that she could clearly (and cutely) organize some supplies for her kiddos. She picked up some jars at Hobby Lobby and some scrapbook paper and away I went...

These are the jars that we started with.
I found a shape on my Silhouette machine that I just loved, so I picked out some scrapbook paper and cut out one of these for each jar. I used Elmer's spray adhesive to attach them to the jars.

Then I got some black cardstock and made 4 more of the same shape, just a bit smaller.

I cut out (of white vinyl) all of the labels that she wanted for the jar, put them on transfer paper and then applied them to the black cardstock.

I decided to add white eyelets to the sides of each black cardstock label (to run ribbon through).

Then I cut 3" strips of ribbon to run through each eyelet and I just tied them into knots. I used the leftover ribbon from the name plate so that they would all match.
Then I used more Elmer's adhesive to spray the backs of them and attach them to the black and white scrapbook paper that I already had on the jar. I just held it down for about 30 seconds (especially close to the ribbon) to make sure that it dried and everything was stuck down well.

I was able to find a set of 10 pencils for $1.44 at Wal-Mart that matched her decor, so I picked up two packages. Don't they look adorable in this jar? Plus, when she "loans" out pencils to students - it'll be easy to identify which ones need to be returned.

She'll fill this one with those big pink erasers. I wish we could find other colors, but the pink ones were on sale, so those are the ones that she bought!

She found rulers on sale too, so she'll have plenty to fill this jar up.

And for when the kids are good and deserve a treat, she has a candy jar! I told her that she was only allowed to give out tootsie rolls because those match her jars! :)

And all of the jars done! I'm really pleased with them. I think they came out really well and I can't wait to see them in her classroom.

Wednesday, July 27, 2011

Custom Classroom Name Plate

My little sister really liked the nursery plate that I made for Denver's room and wanted something similar for her new classroom. She went to Hobby Lobby and picked up the plate and picked up some ribbon and brought it back to me and asked me to make her something from it.

This is the plate that I started out with.

I got on my computer and pulled up the Silhouette Studio program, that goes to my silhouette machine (now that I FINALLY started using it, I'm a bit obsessed).

I decided I would just make a name plate for her desk or bookshelf. I cut her name out in black vinyl (font is called Andrea Karime), and then cut out a piece of transfer paper. Once you get all of the extra vinyl off, you peel the backing off the transfer paper and smooth it onto your vinyl. Then you place your vinyl wherever you would like to adhere it, peel off the back (the vinyl will be stuck to the transfer paper) then you place the transfer paper down, smooth it and make sure you get all the bubbles out and then wah-lah! You have vinyl! This is what the plate looked like after I placed the vinyl, with the transfer paper. Then I threaded some cheap (99 cents per roll) ribbon through it and tied a small bow on the top. Just an fyi though - if you want to make a plate like this and you have a patterned ribbon... Start upside down at the bottom of the plate and thread it around. By the time you get to the top of the plate, the ribbon will be right side up and your bow will come out pretty. I say this because I learned the hard way. If you look back at the nursery plate that I made for Denver - the pattern on the ribbon is upside down at the top.

This craft is easy and cute! I think it took me 15-20 minutes from start to finish.

Tuesday, July 26, 2011

33 Weeks

Pregnancy Highlights: How Far Along: 33 Weeks Size of baby: Pineapple (19 - 22" long, 4.9 pounds) Total Weight Gain/Loss: +11 pounds Maternity Clothes: I was given some hand me downs from a dear friend of mine and I finally wore a maternity shirt (for our maternity pictures last weekend). Gender: It's a boy! Denver Ray Fountain Movement: Some times, I can feel him kick at the very top of my stomach and hit or head butt me at the very bottom of my stomach at the same time!
Sleep: I'm having a hard time getting comfortable, but once asleep I'm sleeping well. What I miss: The occasional glass of wine or margarita! Cravings: Nothing really, but I've been eating a lot more sweets than I normally do! Symptoms: Sciatica on my right side and numbness in my left arm and my right leg. Best moment this week: Darren and I spending my last birthday (in my 20s) as just the two of us before our little one arrives! Only 7 more weeks (and only 4 more weeks until we're full term)!

Monday, July 25, 2011

Custom Classroom Letters

My little sister recently signed her first teaching contract and is in preparations to get her classroom ready for the start of school. Between the two of us, we came up with quite a few cute ideas for her room. The first thing she wanted to have made was the word "Inpsire" to hang on her wall. She went to Hobby Lobby and got the letters, paper and paint and I lucked out in finding the embellishments on a trip to Wal-Mart.
I took all of the letters out into the yard, turned them backwards (you only need to paint the backs and sides of the letters) and spray painted them all black.
When everything was dry, I brought them inside and traced all of them on the scrapbook paper. Remember to put the right side of the letter down on the wrong side of the paper to trace it.
Here are all of the letters all cut out. She is doing a black and white theme (all different patterns) with accents of red.
Then, I got my spray adhesive out to glue all of the paper to the letters. Be careful if you use this stuff - this is the best spray glue I have ever used but it sticks to everything! I ruined a scrapbook cutting mat when I was working on the nursery letters, so I just put an old catalog down on the mat for the remainder of that project and its stuck to the mat. I do all of my gluing on it now!
The process of gluing and smoothing the paper down is very fast. This is the basis of what the letters will look like.
Because I'm anal, I flip the letters over and cut all of that excess off with an xacto knife.
Then I started embellishing! I bought a package of these white flowers (4 were in a pack). I decided to use one of the large ones as they were, but really needed two of the smaller ones to be black.
So, I got out my trusty spray paint and painted them black. First, I took the rhinestone off the middle, then sprayed them and then glued it back once they were dry.
For the other letters, I used these self-adhesive rhinestones. I had to apply them with tweezers because they are very small, but after a couple of hours (yes, I said hours), I got them all on!
I put rhinestones everywhere the lines connected on 3 of the letters.
The black spray painted flowers came out pretty nicely, I think!
The paper on this letter was "busy" enough so I didn't add anything to it.
This is another letter with rhinestones.
Like the "S", I left this one alone.
The white flower, just like it was bought. I just added some spray glue to the back for extra hold.
And then the last letter with rhinestones. All in all, I think they turned out really well. The most important part is, my little sister is really happy with them. She has decided that she's going to get some red ribbon to hang them up with. I can't wait to see them in her room!

Friday, July 22, 2011

An Inexpensive Gift

A friend of mine's birthday was Tuesday and I didn't get to see her, so her and another friend of ours and I went out to dinner Wednesday so I decided I wanted to take her a little something for her birthday. I have a card for her but I thought something sweet to go with it might be nice.

I ran to the store and got what I needed to make homemade chocolate chip cookies. I made some up, let them cool and decided to wrap them in a little cellophane. I got them all wrapped up and tied with a rubber band, but the top of the cellophane really needs to be trimmed because it takes away from the rest of the "package". I just trimmed a little off the top. If you're going to do something like this, make sure that you don't trim it even, make it a little jagged - it lays nicer.

Then I got out some "Happy Birthday" ribbon I already had and tied it with a small bow. I'm pretty sure that instead of store bought gifts, I'm going to be making more gifts like this from now on. For one, it's a lot cheaper and since I'm on maternity leave and not making any money - that's a plus and second of all, it's a nice "from the heart" gift that I think most people would enjoy.